How to Send Products to Amazon FBA

Fulfilled by Amazon (FBA) is one of the most popular fulfillment networks in the world. In fact, an estimated 94% of Amazon sellers participate in the program (although many use a hybrid model and fulfill their orders outside of FBA). It’s an attractive option, as you gain access to Prime, Amazon takes over customer service and returns management, and direct-to-consumer costs through FBA can be extremely competitive.
Still, getting started can be a hassle; you have to navigate an increasingly complex Seller Central while staying on top of best practices, fees, FBA requirements, and learn how to send products to Amazon FBA. Although you can outsource these tasks to a 3PL — which will prep, box, and label your packages, then ship them directly to FBA — you can send products to Amazon FBA on your own, and this guide will show you how, step by step.
How to Send Products to Amazon FBA – Adding inventory
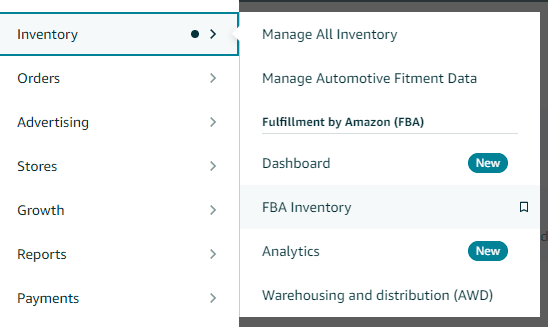
How to send products to Amazon FBA begins with going to the Seller Central menu, hover your mouse over Inventory and click FBA Inventory.
Click Add Products.

Select the product you’d like to send to FBA. Keep in mind, if you’re just beginning, you’ll have to add all details for your products. You may also have to request permission to sell the product on Amazon, set up a GTIN, and more.
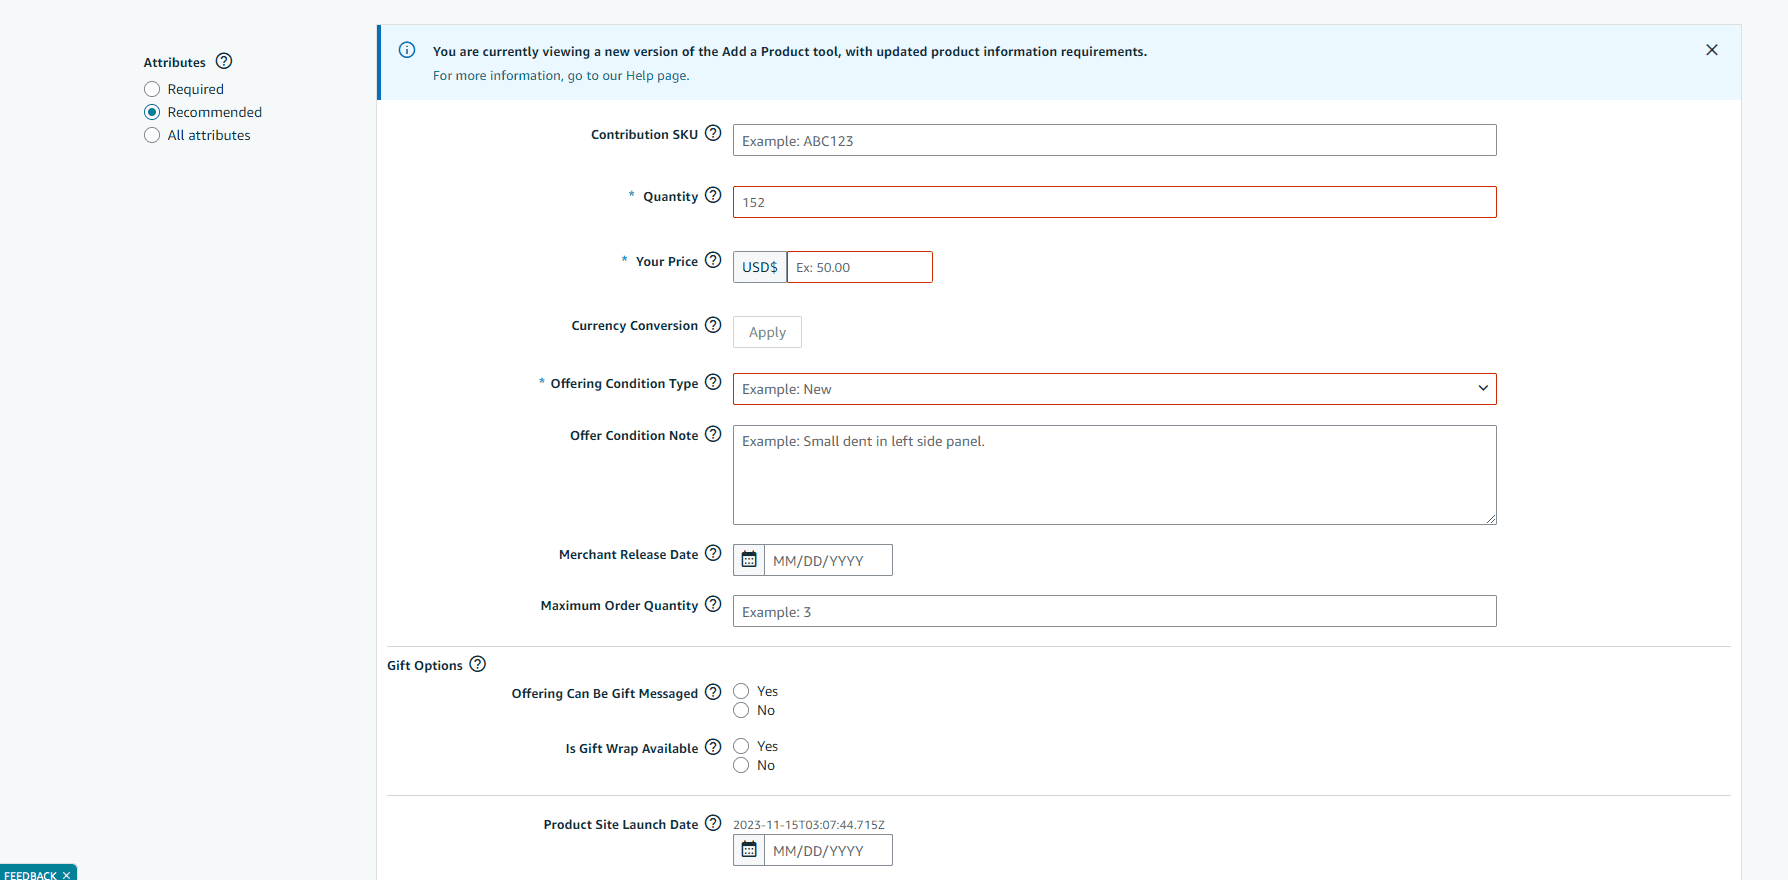
If it’s your first time adding a product, you’ll have to fill out information for it in the Add a Product tool. Have ready the SKU, quantity being shipped, price, condition, gift options, product site launch date, item weight, item dimensions, safety information, packaging size, packaging weight, etc.
Then, choose “Amazon” under the fulfillment channel.
If you already have products listed on Amazon, you can go to Manage All Inventory in the menu, navigate to the original product, and click “Convert to FBA” at the top. This will remove the listing from Amazon until the product arrives at an FBA warehouse. Converting inventory to FBA should happen instantly if you’re already registered in the program, so you can then move on and set up a workflow.
How to Send Products to Amazon FBA – Setting up a workflow
The Send to Amazon workflow is how to send products to Amazon FBA. It allows you to add inventory for FBA and Multi-Channel Fulfillment (MCF), so you use one process for both methods. In addition, you can save workflows for future shipments and send the same ones or make small changes multiple times. With everything in one place, resending and restocking inventory for FBA is now a matter of a few clicks (provided you don’t make major changes to the shipments).
From the Seller Central menu, hover over Inventory and click Shipments.
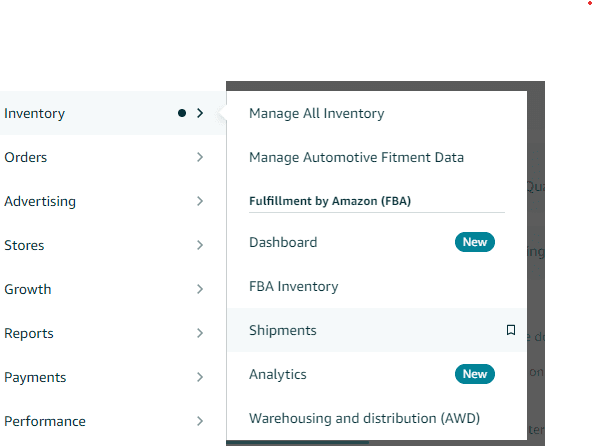
In the menu on that page, select Shipments from the dropdown menu, and choose “Send to Amazon.”

Select your inventory manually from your uploaded catalog or choose to upload an Excel file with your full shipment. When learning how to send products to Amazon FBA this can save time if you’re sending a larger number of products to FBA at once. An Excel file will look like this:

Be sure to include the following information in the Excel file:
- Default labeling owner, Amazon/Seller (i.e., who’s labeling units. If it’s Amazon, you’ll pay a fee for this)
- MSKU (A SKU of 80 characters or less)
- Quantity (number of units)
All other data is optional, but adding it now means you won’t have to do so later in the workflow.
The dashboard and workflow are the way to go if you’re only uploading a few items. For example, after creating and saving a workflow, you could simply click a button to resend it later.
Next, select SKUs from your FBA list or upload an Excel file.

If you haven’t added prep details, you’ll have to go through the steps in Amazon. That means:
- Setting size
- Choosing packaging and follow requirements (e.g., polybagging or shrink-wrapping)
- Adding a packing template such as per SKU, labeling, etc. (you can have up to three per SKU)
From here in the how to send products to Amazon FBA process you’ll be able to see who’s prepping and labeling. In this case, the seller is responsible, meaning you won’t have any prep or label fees. However, you will have to polybag and label each item, then put the SKU label on the box.
After, you start packing:
- Select the number of boxes. If one box, enter its dimensions and weight. If more than one, add box details either with a barcode, excel sheet, or another method.
- Choose between “Small Parcel Delivery” (with a carrier) and “Less Than Truckload” or “Full Truckload” (freight).
- Pack everything — or, at least say you did. You can complete this later, as there’s no need to pack items before confirming shipments. Just know how much everything weighs.
- Select the shipment date.
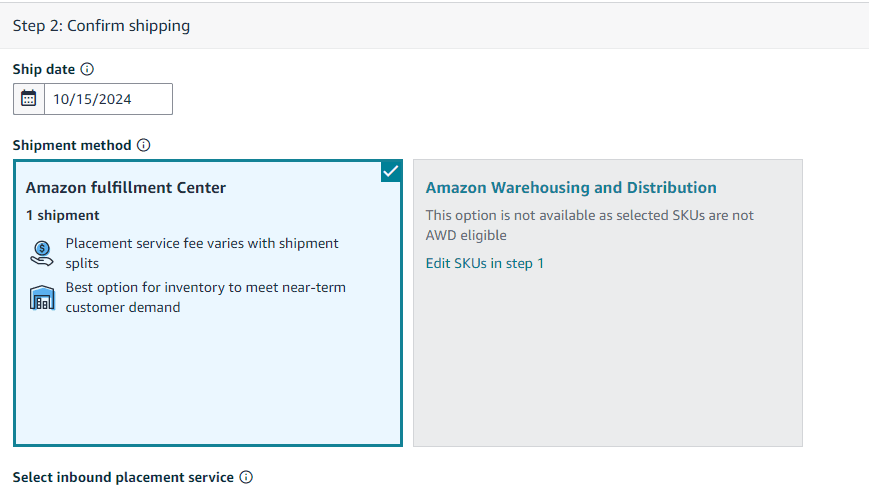
- Choose whether you’re shipping to an Amazon fulfillment center or Amazon Warehousing and Distribution (AWD), which will save you money.
- Select how you’ll split up shipments (e.g., Amazon-optimized shipment splits, partial shipment splits, or minimal shipment splits). If you’re only shipping to one region, you can select it manually.

You can compare your carrier costs at this time. You’ll also want to double-check the location where you ship from, as this can significantly impact costs. Then, review your total fees, accept charges, and confirm shipping.
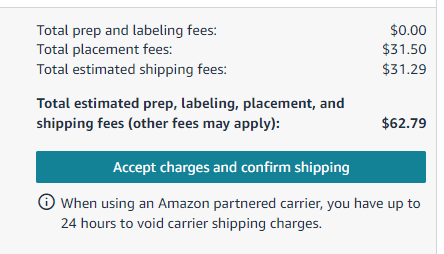
Lastly, print your box and pallet labels, prep products appropriately, and send them to Amazon. You’ll be able to track details and shipment progress in your dashboard or with your carrier if you’ve chosen a partner other than Amazon.
Replenishing inventory in Amazon FBA
Once you’ve sent inventory to Amazon, it’s a breeze to duplicate that shipment again and again, or make small tweaks. With the workflow saved, you can replenish stock quickly. You can also set up a new workflow using the same SKUs but organized into different boxes and pallets.
How to send products to Amazon FBA best practices
To support smooth operations follow these best practices for how to send products to Amazon FBA:
- Compare the costs of different Amazon-affiliated carriers. You might be surprised to find the rates aren’t always the same, so it’s good to look at multiple options.
- Ship goods in bulk to reduce fees. Send at least five cartons or pallets of each item in your shipping plan, with the same mix and quantity of items per container, so you won’t have to pay Amazon’s placement fees.
- Ship to an FBA prep center to ensure your products are prepped and ready to go. That entails polybagging, shrink-wrapping, and labeling, complete with packing into boxes and cartons according to Amazon’s standards. You can use features like Global Shipping, but expect to pay a hefty Amazon prep fee for products not polybagged and labeled. Correct packing and prep can prevent unexpected fees.
- Pack for shipment splits so Amazon doesn’t have to, meaning you don’t incur extra fees.
- Try to pre-pack and weigh your boxes before setting up a workflow. You’ll obviously have to print your SKU labels and prep individual products. However, with that done, you can pack your boxes and cartons, measure them, and seamlessly fill out your workflow all at once. If you work with an FBA prep center, they’ll do that for you.
- Prepare labels correctly. FBA requires labels for individual units, packages, boxes, pallets, carriers, hazardous and fragile warnings, etc. Mistakes with labeling will earn you extra fees.
Wrapping up — Be thorough with your FBA shipments
FBA gives you access to Prime customers and two-day shipping, while Amazon takes over much of your customer service and fulfillment. However, there’s a lot to prepare before you ship goods to one of their fulfillment centers. By embracing workflows, especially Send to Amazon, that process becomes simpler. It’s also easy to repeat when you want to restock, and you can even compare carrier costs before shipping. Take your time when planning shipments to FBA to avoid expensive errors and keep your Amazon business running without interruption.
